Application setup
This guide is specific to Xenomai 3, describing the way to build and run an application. The description applies to both Cobalt and Mercury configurations indifferently, unless otherwise stated. The term application exclusively refers to user-space programs based on the Xenomai 3 libraries. There is no reference whatsoever to any kernel-based context.
Building a Xenomai 3 application
The most important rule of thumb is to always retrieve the
compilation and link flags from a call to xeno-config --cflags and
xeno-config --ldflags respectively, mentioning the list of Xenomai 3
APIs your application uses. The complete usage of the xeno-config
script can be found at
this URL.
Invoking xeno-config from a Makefile:
    CFLAGS := $(shell xeno-config --posix --cflags)
    LDFLAGS := $(shell xeno-config --posix --ldflags)
Failing to use xeno-config for retrieving the proper build flags for
a Xenomai 3 application would most likely produce a bad executable
which would not work as expected.
Running a Xenomai 3 application
For Cobalt, you will need the real-time core built into the target
Linux kernel as described in this document.
For Mercury, you need no Xenomai-specific kernel support so far,
beyond what your host Linux kernel already provides. Your kernel
should at least provide high resolution timer support
(CONFIG_HIGH_RES_TIMERS), and likely complete preemption
(PREEMPT_RT) if your application requires short and bounded
latencies.
Any Xenomai 3 application recognizes a set of standard options that
may be passed on the command line, described in this
document.
In addition, the Alchemy, pSOS ™ and VxWorks ™ APIs
running over the Cobalt core can define the clock resolution to be
used, given as a count of nano-seconds, i.e. HZ=(1000000000 / ns), by
the --{alchemy/psos/vxworks}-clock-resolution=<ns> option.
If your application combines multiple APIs, you may pass several
clock-resolution switches to set them all. The default value depends
on the API being considered. For instance, the VxWorks ™ and pSOS ™
emulators default to millisecond clock rates. The Alchemy API is
tickless by default, i.e. --alchemy-clock-resolution=1. Specifying
a resolution greater than 1 nanosecond requires the low resolution
clock support to be available from the Xenomai 3 libraries (see the
--enable-lores-clock configuration
switch).
Valgrind support
Running Xenomai 3 applications over Valgrind is currently available to the Mercury core only. When the Valgrind API is available to the application process, the configuration symbol CONFIG_XENO_VALGRIND_API is defined at build time, and may be tested for existence by the application code. See the tool documentation at this address.
The Xenomai 3 autoconf script will detect the Valgrind core header on the build system automatically, and define this symbol accordingly (i.e. /usr/include/valgrind/valgrind.h). You may need to install the Valgrind development package on your build system to provide for the core header files. For instance, such package is called valgrind-devel on Fedora.
Available real-time APIs
Alchemy |
This is a re-implementation from scratch of Xenomai’s 2.x native API, fully rebased on the new RTOS abstraction interface. |
pSOS |
pSOS ™ is a registered trademark of Wind River Systems, Inc. |
VxWorks |
VxWorks ™ is a registered trademark of Wind River Systems, Inc. |
Built-in Xenomai 3 command line options
Any application linked against the Xenomai 3 libraries automatically
recognizes a set of standard options that can be passed on the command
line. There is nothing you need to add to your application code for
these option switches to be interpreted and acted upon. For instance,
the --dump-config switch is always recognized by an application,
dumping the settings used for building the Xenomai 3 libraries it is
linked against:
Xenomai/mercury v3.0-rc5 -- #e91216a (2015-05-12 17:58:01 +0200)
CONFIG_MMU=1
CONFIG_SMP=1
CONFIG_XENO_ASYNC_CANCEL=1
CONFIG_XENO_BUILD_ARGS=" '-prefix=/home/rpm/install/xenomai/mercury' '--enable-async-cancel' '--enable-lores-clock' '--enable-debug=full' '--enable-smp' '--enable-tls' '--with-core=mercury' '--enable-registry' '--enable-pshared' '--enable-maintainer-mode'"
CONFIG_XENO_BUILD_STRING="x86_64-unknown-linux-gnu"
CONFIG_XENO_COMPILER="gcc version 4.9.2 20150212 (Red Hat 4.9.2-6) (GCC) "
CONFIG_XENO_DEBUG=1
CONFIG_XENO_DEBUG_FULL=1
CONFIG_XENO_DEFAULT_PERIOD=100000
CONFIG_XENO_FORTIFY=1
...
CONFIG_XENO_LIBS_DLOPEN is OFF
CONFIG_XENO_LORES_CLOCK_DISABLED is OFF
CONFIG_XENO_RAW_CLOCK_ENABLED is OFF
CONFIG_XENO_TLSF is OFF
CONFIG_XENO_WORKAROUND_CONDVAR_PI is OFF
The list of standard options is as follows:
--registry-root=<path> |
Tells Xenomai to root the object registry at the given path,
instead of the default root (see the |
--session=<label> |
Name of the session the new process will be part of (or create if
not present). If All shared objects are allocated from a global heap backed by the main memory pool (see --mem-pool-size). |
--shared-registry |
Exports the registry of the process to other users. If access is possible, also depends on permissions of the registry path. By default, the registry is only accessible for the user that started the Xenomai application process. |
--no-registry |
This switch disables registry support at runtime. No real-time objects will be exported to the registry, despite the registry code was compiled in. |
--mem-pool-size=<size[K|M|G]> |
The size the main memory pool backing the session’s heap, which can be suffixed by a K(ilobyte), M(egabyte) or G(igabyte) binary multiplier. Most of the dynamic allocation requests issued from the Xenomai 3 libraries are served from this pool. In absence of suffix, the value is normally interpreted as a count of bytes, except if lower than 65536, see below. If the value is lower than 65536 with no suffix, it is interpreted as a count of kilobytes for backward compatibility purpose with the former syntax. This work around may disappear anytime when transitioning to Xenomai 3.0 final, so make sure to fix any launch script(s) accordingly. Typically, suffixing the current value with a 'K' multiplier would address the issue. The shared heap is living in the /tmpfs filesystem, and therefore consumes RAM space. |
--cpu-affinity=<cpu[,cpu]…> |
The set of CPUs available for running Xenomai threads created by
the application, in absence of explicit pinning of such threads to a
particular CPU when they are spawned. Defaults to any online CPU. |
--main-prio=<priority> |
Cobalt only. When
|
--print-buffer-size=<num-bytes> |
Cobalt only. When symbol wrapping is in effect
(default case for applications based on the libcobalt POSIX API), Xenomai
interposes on common output calls from the |
--print-buffer-count=<num-buffers> |
Cobalt only. Use this parameter to set the total number of relay buffers (see --print-buffer-size). By default, 4 relay buffers are present in the output ring. |
--print-sync-delay=<ms> |
Use this parameter to set the longest delay (in milliseconds) before the output pending into the relay buffers is synchronized (see --print-buffer-size). By default, the output ring is flushed each 100 milliseconds by the helper thread. |
--[no-]sanity |
Turn on[/off] sanity checks performed by the Xenomai libraries,
mostly during the application startup. Defaults to the value set by the
--enable-sanity switch when configuring (which is enabled by
default). |
--verbose[=level] |
Set verbosity to the desired level, or 1 if unspecified. The level argument may be interpreted differently depending on the application, however --verbose=0 must mean fully quiet. The interpretation of higher levels is application-specific. Defaults to 1. |
--silent --quiet |
Same as --verbose=0. |
--trace[=level] |
Set tracing to the desired level, or 1 if unspecified. The level argument may be interpreted differently depending on the application, however --trace=0 must disable tracing. Level 1 allows tracing the Xenomai 3 library bootstrap code. The interpretation of higher levels is application-specific. Defaults to 0. |
--version |
Get the application and Xenomai 3 version stamps. The program immediately exits with a success code afterwards. |
--dump-config |
Dump the settings used for building the Xenomai 3 libraries the application is linked against. |
--no-mlock |
Mercury only. This switch disables the implicit
This option does not apply to the Cobalt core, which requires memory locking from all clients unconditionally. |
--help |
Display the help strings. |
Configuration and runtime tunables
Tunables are variables used as configuration values while setting up the system (e.g. size of the main memory heap), or controlling its runtime behavior (e.g. verbosity level).
Some of those tunables may be updated by the application’s early code until the system starts initializing the core data structures and bringing up the services, then become read-only from that point. These are called the configuration tunables.
Other tunables may be changed freely at any point in time during the application process lifetime. These are called the runtime tunables.
Accessing the tunables
There is a simple API for reading and updating the current value of any
tunable, composed of the {get/set}_config_tunable(name) and
{get/set}_runtime_tunable(name) C macros.
When --enable-assert is in effect for the Xenomai 3 libraries,
set_config_tunable() enforces read-only access after the configuration
tuning phase, by raising an exception on attempt to change such tunable
after that point.
Each tunable has an arbitrary name, which does not necessarily reflects
the name of the variable actually storing its value. For instance, one
could define tunable foo eventually handling the int bar C variable
under the hood, or even a set of related variables.
Typically, updating and reading back the verbose_level tunable - which
holds the current verbosity level of an application - would look like
this:
#include <stdio.h>
#include <xenomai/tunables.h>

set_runtime_tunable(verbosity_level, 1);
printf("verbosity_level=%d\n", get_runtime_tunable(verbosity_level));
When a configuration tunable is paired with a command line option
updating the same variable(s), the command line has precedence over the
set_config_tunable() call.
Built-in Xenomai 3 tunables
The Xenomai 3 libraries define two sets of built-in tunables.
| NAME | DESCRIPTION | DEFAULT |
|---|---|---|
cpu_affinity |
|
any online CPU |
no_mlock |
|
off |
no_sanity |
|
!CONFIG_XENO_SANITY |
no_registry |
|
off (i.e. enabled) |
mem_pool_size |
|
1Mb |
session_label |
|
none (i.e. anonymous) |
registry_root |
|
CONFIG_XENO_REGISTRY_ROOT |
shared_registry |
|
off (i.e. private) |
Configuration tunables
| NAME | DESCRIPTION | DEFAULT |
|---|---|---|
verbosity_level |
|
1 |
trace_level |
|
0 |
Runtime tunables
Defining your own tunables
You can add your own tunables using the
define_{config/runtime}_tunable(name) and
read_{config/runtime}_tunable(name) C macros.
The define_tunable syntax provides the helper code for updating the C
value(s) matching the tunable name. Conversely, the read_tunable
syntax provides the helper code for returning the C value(s) matching
the tunable name.
The application code should use {get/set}_config_tunable(name) or
{get/set}_runtime_tunable(name) for accessing the new tunable,
depending on its scope.
Defining and using a simple tunable
/* Out of line definition. */

code.c:

int foo_runtime_variable;

define_runtime_tunable(foo, int, val)
{
        /*
         * The code to update the internal variable upon a call to
         * set_runtime_tunable(foo).
         */
        foo_runtime_variable = val;
}

read_runtime_tunable(foo, int)
{
        /*
         * The code to return the current tunable value upon a
         * call to get_runtime_tunable(foo).
         */
        return foo_runtime_variable;
}

header.h:

/* Declaration of the manipulation helpers */

define_runtime_tunable(foo, int, val);
read_runtime_tunable(foo, int);

/* Conversely, we could be using an inline definition */

header.h:

extern int foo_runtime_variable;

static inline define_runtime_tunable(foo, int, val)
{
        foo_runtime_variable = val;
}

static inline read_runtime_tunable(foo, int)
{
        return foo_runtime_variable;
}

/* Accessing the new tunable, inverting the value. */

int setting = get_runtime_tunable(foo);
set_runtime_tunable(foo, !setting);
Overriding factory default values of tunables
It may be convenient to provide your own factory default values for some configuration tunables, before they are considered for initializing the application.
For this early tuning to happen, you need to interpose your own handler in the chain of tuning handlers the Xenomai 3 bootstrap code runs before starting the actual initialization process. This can be done with a Xenomai 3 setup descriptor as follows:
#include <xenomai/init.h>
#include <xenomai/tunables.h>

static int foo_tune(void)
{
        /*
         * We need more than 1MB which is Xenomai's default, make
         * it 16MB before the Xenomai core starts initializing
         * the whole thing. --mem-pool-size=<size> may override
         * this value.
         */
        set_config_tunable(mem_pool_size, 16MB);

        /*
         * Also turn verbosity off by default. --verbose=<level> on the
         * command line may switch this to verbose mode.
         */
         set_runtime_tunable(verbosity_level, 0);

         return 0; /* Success, otherwise -errno */
}

/*
 * CAUTION: we assume that all omitted handlers are zeroed
 * due to the static storage class. Make sure to initialize them
 * explicitly to NULL if the descriptor belongs to the .data
 * section instead.
 */
static struct setup_descriptor foo_setup = {
        .name = "foo",
        .tune = foo_tune,
};

/* Register the setup descriptor. */
user_setup_call(foo_setup);
Application entry (C/C++)
From the user code standpoint, every application starts in the main()
routine as usual.
Some link flags used for building the application have an influence on
its initialization sequence; such flags are retrieved by a call to
xeno-config --ldflags, passing along the list of Xenomai 3 APIs the
application depends on (e.g. xeno-config --posix --alchemy --ldflags).
The Xenomai 3 libraries can take care of such sequence for bootstrapping their services appropriately (i.e. automatic bootstrap), or leave such duty to the application code (i.e. manual bootstrap).
Automatic bootstrap
If the automatic bootstrap mode is used, the application receives the
set of command line switches passed on invocation in the main()
routine, expunged from the Xenomai 3 standard options. In this mode,
all Xenomai services are readily available when main() is entered.
This is the default behavior most applications should use.
Manual bootstrap
In manual bootstrap mode, the application receives the original argument vector unaltered, with the Xenomai services not initialized. You should use this mode if you need some early initializations of your own to take place before the Xenomai services are started.
The manual bootstrap mode is enabled by linking with the flags received
from xeno-config --ldflags --no-auto-init.
In such mode, the application code must call
xenomai_init(&argc, &argv) at some point in the initialization step,
to bootstrap the Xenomai services for the process. This routine handles
all standard Xenomai options, then updates the arguments to point to a
copy of the original vector, expunged from the Xenomai options.
Afterwards, the application code can collect and handle the unprocessed options from the command line, and use the Xenomai services with no restriction.
Dealing with C++ static constructors
The initialization sequence guarantees that C++ constructors - with default priorities - of objects instantiated within the main executable will run after the Xenomai services have been bootstrapped in automatic mode. This means that class constructors for static objects from the main executable may call Xenomai services.
Since Xenomai services are not available until xenomai_init() has been
called in manual bootstrap mode, no such guarantee
exists in this case, until that routine is invoked and returns
successfully.
As described for the initialization process through the various software layers, C++ constructors of static objects instantiated by shared libraries will NOT have access to Xenomai services, since the Xenomai bootstrap code runs later.
If you have non-default static constructor priorities, or static objects
instantiated in shared libraries your executable depends on, you may
need to provide your own early bootstrap code, in case the constructors
need to call Xenomai services. This code should eventually call
xenomai_init() for bootstrapping the Xenomai services, before these
C++ constructors may invoke them.
Handling application-defined arguments
You may want to provide for your own command line switches to be interpreted by the application code.
If the automatic bootstrap mode is used, the application directly
receives the set of command line switches passed on invocation in the
main() routine, expunged from the Xenomai 3 standard options.
With a manual bootstrap, the application receives
the original argument vector passed on the command line. Calling
xenomai_init(&argc, &argv) processes then removes all standard Xenomai
options from the vector before returning to the caller.
In both cases, the application-specific options present in the argument
vector can be retrieved with the getopt(3) parser as usual.
Parsing application-specific arguments
#include <getopt.h>
#include <stdio.h>
#include <xenomai/init.h>

int foo_mode = 1; /* Default */

static const struct option options[] = {
        {
#define foo_mode1_option        0
                .name = "foo1",
                .flag = &foo,
                .val = 1,
        },
        {
#define foo_mode2_option        1
                .name = "foo2",
                .flag = &foo,
                .val = 2,
        },
        {
                /* sentinel */
        }
};

int main(int argc, char *const *argv)
{
        int lindex, ret, opt;

#ifdef MANUAL_BOOTSTRAP
        /* xeno-config --no-auto-init --ldflags was given. */
        ret = xenomai_init(&argc, &argc);
#endif
        for (;;) {
                lindex = -1;
                opt = getopt_long_only(argc, argv, "", options, &lindex);
                if (opt == EOF)
                        break;
                switch (lindex) {
                case foo_mode1_option:
                case foo_mode2_option:
                     break;
                default:
                        usage();
                        return 1;
                }
        }
        ...
}
Under the hood
Initialization sequence
The Xenomai 3 application initialization process bootstraps the software layers as follows:
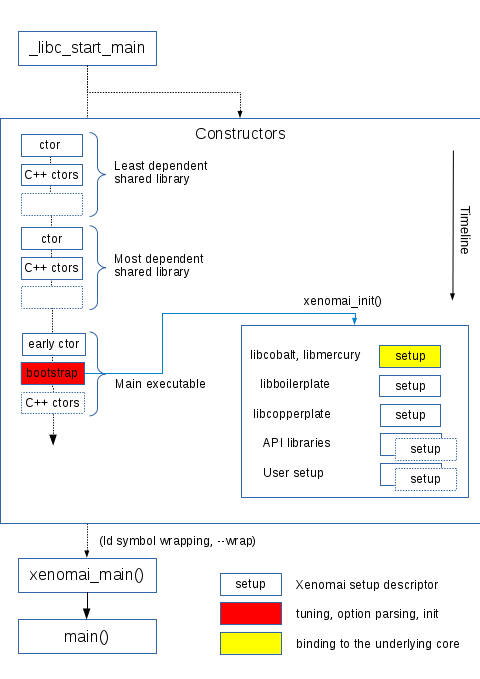
lib/boilerplate/init/bootstrap.c implements the bootstrap handler
which is glued as an object file to the main executable of the
application, so that it is guaranteed to run after any shared library
constructor the application depends on, regardless of the library
constructor priorities.
In automatic bootstrap mode, The xenomai_main() routine interposes on
the real main() entry point, for passing it the pre-processed argument
vector, expunged from the Xenomai 3 standard options. This trick is based
on the linker’s symbol wrapping feature (–wrap).
xeno-config
issues the right set of linker flags to enable such interposition,
unless --no-auto-init is given.
Adding your own setup code
Xenomai 3 implements a flexible mechanism for running setup code in an orderly manner, on behalf of the bootstrap handler glued to the application.
This mechanism is based on setup descriptors
(struct setup_descriptor), each defining a set of optional handlers,
which shall be invoked by the Xenomai 3 bootstrap code at different stages
of the initialization process. A priority level is assigned to each
descriptor, which defines the calling sequence among multiple
descriptors implementing the same handler. The corresponding C
definitions and types should be obtained by including
<xenomai/init.h>.
There are three initialization stages, listed by order of precedence, each assigned a handler in the setup descriptor. NULL handlers can be used to skip a descriptor for a given phase.
-
Factory tuning step, via setup_descriptor→tune(). Each setup descriptor is given a chance to assign a value to standard or application-defined tunables. This is the handler we used for changing a default tunable value.
-
Command line option parsing, via setup_descriptor→parse_option(). If this handler is present, setup_descriptor→options must point to a getopt(3) option array, enumerating the valid options defined by this descriptor.
The →parse_option() handler is passed the position of each option found into the command line which matches an entry into the setup_descriptor→options array, along with the argument value received. If the option does not carry any argument, NULL is passed instead.
The →help() handler is called whenever the –help switch is passed on the command line. All help handlers from the descriptor chain will be called in turn, from low priority to high.
Option parsing happens after the tuning step, so that command line options affecting tunables can override the factory values defined by the →tune() handlers.
- Initialization step proper, via setup_descriptor→init(). Based on the current settings obtained from the previous steps, this handler is called for bringing up the feature or service it provides.
All handlers should return zero on success, or a negated POSIX error code on error. Upon error, the bootstrap sequence is immediately terminated, and the application exits with a fatal message.
The example below introduces a custom code into the initialization sequence, for setting some base tunables then parsing a set of local command line options, before bringing up a specific feature. These custom handlers will be called after all Xenomai handlers from the same category have been fired. Such code could be part of an ancillary library attached to your application for instance, or implemented by your main executable.
Adding a custom setup code
#include <getopt.h>
#include <stdio.h>
#include <xenomai/init.h>
#include <xenomai/tunables.h>

int half_value;

static int foo_value = 16; /* Default */

static const struct option foo_options[] = {
        {
#define foo_option      0
                .name = "foo-value",
                .has_arg = 1,
        },
        {
                /* sentinel */
        }
};

static int foo_tune(void)
{
        /*
         * We want a 8MB heap by default. User may override
         * this with --mem-pool-size if need be.
         */
        set_config_tunable(mem_pool_size, 8MB);

        return 0;
}

static int foo_parse_option(int optnum, const char *optarg)
{
        /*
         * Xenomai's command line parser will call us only for
         * valid options we know about, we just need to evaluate
         * the argument.
         */
        switch (optnum) {
        case foo_option:
                foo_value = atoi(optarg);
                break;
        default:
                /* Paranoid, can't happen. */
                return -EINVAL;
        }

        return 0;
}

static void foo_help(void)
{
        fprintf(stderr, "--foo-value=<val>              some value for no usage\n");
}

static int foo_init(void)
{
        if (foo_value & 1)
            /* Uh, cannot deal with odd values. */
            return -EINVAL;

        half_value = foo_value / 2; /* Let's init stuff. */

        return 0;
}

static struct setup_descriptor foo_setup = {
        .name = "foo",
        .tune = foo_tune,
        .parse_options = foo_parse_option,
        .options = foo_options,
        .help = foo_help,
        .init = foo_init,
};

/* Register the setup descriptor. */
user_setup_call(foo_setup);
Extending the help strings
When –help is given on the command line, the Xenomai option handler intercepts it and issues information from outer to inner code, following the decreasing priorities of the registered setup descriptor. i.e. from the most application-specific code to the most generic libraries providing help strings. Typically, this should make your application-defined help strings appear first.
#include <xenomai/init.h>
#include <stdio.h>

/*
 * This is a routine with a weak binding we may override for
 * providing our own help message header. get_program_name()
 * is a Xenomai helper readily available when including
 * <xenomai/init.h>.
 */
void application_usage(void)
{
        fprintf(stderr, "usage: %s [options]:\n", get_program_name());
}
If you need to call the help string dumper manually (e.g. should a
different option than --help trigger this), you can invoke
void xenomai_usage(void).
Extending the version information
By default, the Xenomai 3 core library issues its own version
information when --version is found on the command line. The
application can insert its own signature in the output message to
stderr by implementing the void application_version(void) hook.
#include <xenomai/init.h>
#include <stdio.h>

/*
 * This is a routine with a weak binding we may override for
 * providing our own version header. The version message
 * would then be:
 *
 * $ ./foo --version
 * foo utility v1.2
 * based on Xenomai/mercury v3.0-rc4 -- #eaca2e7 (2015-05-13 12:17:21 +0200)
 */
void application_version(void)
{
        fprintf(stderr, "foo utility v1.2\n");
}
The Xenomai 3 version string is available from the const char *xenomai_version_string constant, exported by <xenomai/init.h>.